At some point in the journey of building your Shopify store, you are going to hit the ceiling of organic visitors on your site or online store.
There’s only so many people that can visit through word-of-mouth, pure love, or accidentally stumbling upon your store while searching for products on the internet. This is where advertising comes in.
There are numerous macro and micro platforms on which you can spread the word, but social media is definitely a major one.
With Facebook in the lead, while also having its hand in some other platforms, it’s surely one of the best social networks on which to advertise an eCommerce store. But with a multitude of businesses advertising on the platform, it can be hard to stand out.
To avoid being just another business hoping to get some attention, here’s a quick Facebook ads guide you can follow:
Tune Up Your Facebook Business Manager
This is basically the area that brings together your store’s business pages, the ad account and any other tools that help you manage an ad campaign. Start by creating a business page, then go to business.facebook.com to set up your business manager.
Fill in the business name, email address and any other information requested. Proceed to the business settings, click Accounts, then Ad Accounts. Here you can add an ad account or create a new one if you’ve never boosted/promoted a post or page.
Add The Facebook Pixel To Your Store’s Website
A Facebook Pixel comes in the form of code you set up using your Business Manager account and add to your website. What it basically does is to inform you on the relationship between your ad campaign and the traffic it drives to your site.
Under Business Settings, you’ll find a subsection called Data Sources, and this is where the Pixels option is housed. Once you add a pixel, you can copy the 15-digit ID, go to your Shopify store preferences, select Online Store and paste it in the Facebook Pixel ID field.
You can then open the Analytics section of that Pixel in your Business manager account and start viewing the activity shortly.
Come Up With Audiences
Think of these as groups of people described by certain attributes, that you can select and target with your ads. Before you get into creating these presets, understand whether you’re retargeting or prospecting.
With retargeting, you’re basically trying to speak to people who have already visited your store, and maybe even searched, viewed or added a product to a cart. When it comes to prospecting, you’re trying to reel in new people.
Retargeting
In the Audiences section of your Business Manager, you’ll find Custom Audiences, where you can describe what kind of people to target. For example, you can describe an audience as anyone who visited the website in the last 14 days.
There are a number of source options to choose from; website traffic, customer file, offline activity and app activity. The website traffic option will help you create the kind of descriptions above. With the Customer File option, you’ll have to submit information you collected e.g. email addresses.
You can also use Custom Conversions to retarget customers. Create one and specify a category like adding to a wishlist or purchases above a given value. All customers whose visits ended in that specified conversion will be targeted by the ad.
There is also an option called Standard Events that involves creating some code so as to target people who carry out a particular action while on the store’s site.
Prospecting
If you want to target potential customers, one of the main tools at your disposal is the Lookalike Audience option. This helps you by referring to information you submitted in the Customer File option or descriptions you created using the Website Traffic option.
It will come up with new crowds that resemble the ones you created for retargeting but without the already existing customers in them. In the case where you don’t have already set groups, you can rely on setting interests, behaviors and demographics.
For interests, you mainly pinpointing types of pages they might follow or look at occasionally. Behaviors are more about things like whether they attended an event, got engaged etc.
Demographics lean more towards attributes like educational qualifications, marital status, location, age etc. You can also use the Audience Insights tool under the Plan section of your Business Manager.
This will rely on your Facebook page and given demographics to give you more characteristics about the kind of people you may want to target.
Start A Campaign
Now that you’re all set up, it’s time to create an ad campaign. The first step is to establish a goal. Facebook gives you a chance to pick from a long list of objectives. Make sure you pick the one that is closest to what you’re trying to achieve.
This could be sending people to your store’s website, or increasing conversions. Create ad sets where you have different ads working towards related goals. Continue and select your audience. Here, you can recall a custom audience you created.
After that, choose where you want your ad to appear. If you don’t have accurate information on what hardware and software most of your target audience is using to access Facebook, keep this on automatic.
Where you have more clarity, say you want to increase traffic from mobile devices, you can select mobile news feeds for example. Always name your ads properly so that anyone using the account can easily tell them apart.
For instance, you can have one named as Mobile Electronics Sales. This may be one that targets mainly mobile users, promoting electronic products with a link to the “Add to Cart” or “Buy” stage. Choose your budget and schedule.
At this stage, it is important to remember that you may occasionally have to revisit the campaign to make some changes. This means that you don’t have to commit to the full period that burns your entire expenditure. Break it down into shorter periods, like weeks.
You can also pick specific times of the day, especially if you have sufficient research on the times when your targets are most likely to buy. Say you’re trying to sell TVs to families, find out who usually makes that purchase. Mom or dad? Do they work?
Are they looking through items to buy while on their way to the office? Or do they do it during a mid-morning break? Some people shop more on the weekend and in the evening. Ensure you take all this into account when setting your schedule.
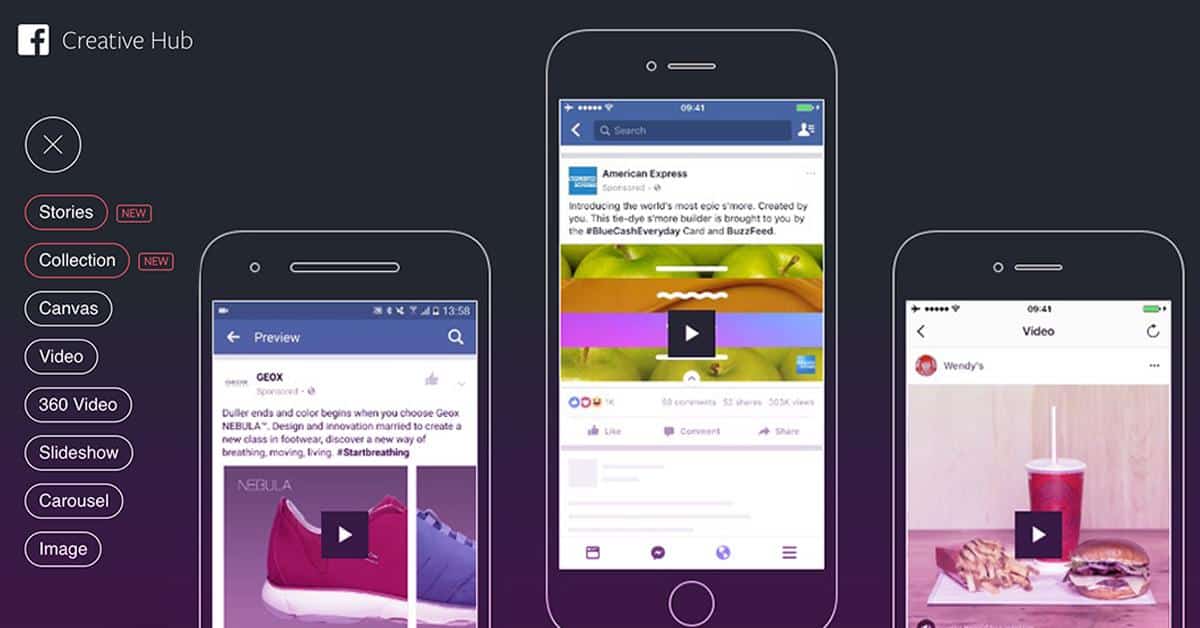
Design Your Ad
Imagine what you’d want your ad to look like. Refer to other ads on the same topic. Take note of the number of images they use. How much text they have in the caption or whether they blend most of it into the graphics. The length of videos included.
The number of other clickables i.e. website links, tagged pages etc. One thing you want to make sure you do is to have your call-to-action very clear. Don’t let it be swallowed up by slogans and mission statements.

It is good to try dynamic options like the slideshow. Most feeds will already have a lot of text and images. Moving objects are more likely to catch someone’s attention, especially if their settings are on autoplay. If you’re using video, select an attractive thumbnail.
This can be some good-looking faces, a bold headline like “50% OFF” or a majestic shot of a product from a good angle. Preview the ad to see how it would look when an audience member views it. If you’re satisfied, click “Place Order” and submit your payment information.
Track The Progress
While you may have a lot of presets by this stage, your Facebook blueprint is incomplete without analyzing results. Within your Ads Manager, click on a campaign and select an ad set. Click on an ad name and continue to view the statistics on how it is performing.
Amongst the Facebook hacks 2020 should offer you is the ability to gain deeper understanding of your reports before involving professionals and other complex tools. A smart way to do this is to work your way from the top to the bottom.
The top in this case is the first metric from the Facebook end i.e. impressions. The bottom is the metric used to measure your goal, say number of orders for a particular product. There are two other metrics that will help to create context, that is the duration of the campaign and the cost.
So on each day, you’re trying to find out how many of those who saw went on to buy, for instance. In this manner, you can slowly peel off those you’ve won over and put them in a retargeting category.
As time goes by, you shrink the size of the prospects in a particular audience until you’re left with a smaller number that doesn’t convert. Then you can move on to a new and slightly altered audience as you run concurrent ads for those you’re retargeting.
The ultimate goal is to make sure you’re not running an ad any longer than you need to be and wasting money on people that aren’t interested. Whenever your curve plateaus or dips, revisit an ad and change a few parts like its placement and age bracket.
This can help you get the extras and not throw away an ad while it can still bring in more results.